Monday, January 25, 2016

Sheep stocking hat

Sheep stocking hat

Living in Wisconsin is amazing, and one of the most interesting things being here is that people notice hats. Here you HAVE to wear a hat; it's just too cold.  It was a "warmish" morning today with temperatures in the low teens with no wind.  So people dress appropriately. 

But, if you wear anything other than a regular black stocking hat, people notice.  My chicken hat was a HUGE hit.  So, knowing that and wanting to dig into my stash of smaller balls of yarn, I did the Sheep stocking cat. 

This was super fast and easy to make.  If you're comfortable knitting in the round and are ready to tackle intarsia knitting, give this one a try.  The floats (where you carry the yarn behind the stitches you're working) for color work are short which reduces snags and frustration and you're only working two colors at a time.

When you stretch it out or put it on and see the sweet sheep you can't help but smile.

Feel free to purchase this hat from my etsy.com shop: Pineknollknits.com


Wednesday, January 13, 2016

Mittens with flair

Mittens with flair

Mittens are a great way to experiment with color combinations, different techniques and stitch patterns as well as basic form.  One of the difficulties I have with mittens, or rather coats, is that cuff of store bought mittens are not long enough.  When I move my arms and the sleeve of my coat moves, I have exposed wrists.


I played around with a wave stitch that I originally learned when making a blanket and just added 2 1/2" to the end of my standard mitten cuff.  To finish the split (the cuff was not knit in the round) I crocheted a single chain stitch to give it a finished look.   The final step was to add a small loop and button to close up the cuff.
 
 
Overall, I was very pleased with the outcome.  I have warm wrists and mittens with a bit of flair.


Monday, November 16, 2015

Lion Hat

A Lion Hat

At dinner one night, I was sharing that I had made a chicken hat for myself and a panda hat for my kiddo.  A friend asked if I could make her a lion hat.  I said of course I could and told her I would make one for her.

Surprisingly, there are no patterns for lion hats so I had to come up with one on my own.  So I whipped out my design and knitting skills and this is what I've come up with.  I have to admit, I'm pretty proud.  Matter will soon be available on ravelry.com

 Back view  and side view

Loop stitches make the prefect curly mane around the face.

I choose to knit this out of Lion Brand yarn, no pun intended, mustard yellow and a beautiful brownish-red for the mane.


Friday, November 13, 2015

Knitting Mittens


Mittens~ a cool weather necessity and great fun to make.

Once the weather turns cool, I can't wait to pull out my hats, scarves and mitten...   Mittens are cousins to socks and just as the left sock always seems to be lost somewhere in the process of laundry, at least one mitten goes missing each year as well.


But no worries, mittens are easy, much easier than socks to make, and great fun.  And thankfully, just as the teen trend is not to wear matching socks, you don't have to wear matching mittens either.

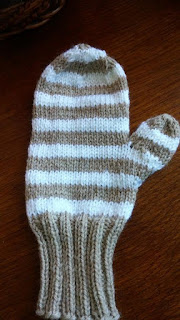
These are a pair of mittens I made last night.  Yep, they're that easy.  The cuffs are a simple 2 X 2 rib (K2, P2) followed by stockinette stitch.  Don't worry about the thumb; follow the directions and you'll be just fine.  You'll slip these stitches off onto either a stitch holder or piece of scrap yarn and knit around them.  Once you've finished with the mitten, you'll come back and knit the stitches for the thumb.

But, if you are really afraid of the thumb; skip it.  Baby mittens are made without thumbs; you never want to give them gripping power before their ready and besides, have you seen the size of those tiny thumbs?

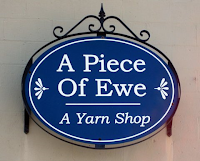
Because mittens are so easy to do, knitting wise, it's a great time to play with yarn.  Go to your favorite yarn shop, mine is A Piece of Ewe.  A Piece of Ewe is in Bay City, Michigan and available on the web at www.apieceofewe.com.  Susan and her team are fantastic and do mail orders as well.  But hit your favorite yarn shop and "pet" yarns.  Which feel good?  Which are soft and luxurious?  Which are so full of color they make you smile?  Those are the yarns you should be using for mittens.

The most important thing to remember is to have fun!  After you've made one, all you do it repeat.  And this is the fun part~ you can repeat in the same color or pattern, or start over again in something completely different!  Just remember to be consistent with sizes and you'll never be frustrated over losing ONE mitten again.

Pattern:
Children s:
Medium: (Women's small, youth large)
Large: (Adult)

Using a set of 4 dps, cast on 40 (48, 56) stitches and join in the round.  Make K2, P2 rib for 2.5 (3, 3.5) inches.  Switch to stockinette stitch for another 1 (1.5, 2) inches.

Begin thumb gusset:  Take a deep breath, it's ok.  Knit 11, place a stitch marker, k3, place 2nd marker, knit to the end of the round.  All of the increases in stitches will happen between these two markers to make the base of the thumb.  By adding stitches, you keep the circumference of your hand and you're not "stealing" stitches for the thumb.

Increase round: Knit 11 to the marker.  Slip the marker to the right needle.  Increase one stitch.  I prefer to make a stitch by picking one up (pick up the bar of yarn between the stitch on the right needle and the stitch on the left). Tin Can Knits, another knitting blog, has a fantastic tutorial on how to add these stitches with fun illustrations.  Tin Can explains this much better than I can, so please see this post http://blog.tincanknits.com/2013/10/03/m1/ for how to pick up stitches if you need it.


Knit the 3 original stitches, make one stitch between the last stitch and the marker, just as before.  Slip marker, knit to end of round.

Next round:  knit.

Repeat these two rounds; increase round and knit round, until you have 9 (13, 17) stitches between the markers.  Once you have this many stitches, on the next knit row, instead of knitting the thumb stitches, remove the  marker and put the stitches on either a stitch holder or piece of string.

From now on, you will knit around these stitches and only work on the hand portion of the mitten.  Once the mitten is 8 (9, 10.5) inches long, begin to decrease to shape the top of the mitten.  You do this by:  K 2, K2tog, all around the mitten.  The next row, knit.  Next decrease row:  K1, K2tog, to end.  Next row knit.  Final decrease row:  K2tog all remaining stitches.

Cutting a long tail, thread the yarn through the remaining stitches and pull tight.  You can then knot this off  and pull to the inside for a nice rounded top mitten.

Returning to the thumb:  Slip the stitches from the holder or scrap yarn back onto your dps.  On the first time around the thumb, you will need to pick up three stitches in the saddles of your thumb or where your thumb meets your hand.  (If you forget this, you'll have a hole in your thumb pit).  Pick up three stitches here and knit in the round over these 12 (15, 20) stitches until the thumb is 1.5" (1.5, 2") from where you picked up your three new stitches against the body of the mitten.  Do NOT measure from the base of the thumb where you started the increases.  If you measure from here, you'll have a very short and stubby thumb which won't allow for movement and it will look silly.

Once you've reached 1.5" (2"), K2tog across all stitches.  Cut long tail and thread yarn through stitches, rounding off and binding the thumb.  Knot on the inside.

You've now made a mitten!!!  And for the best part~ repeat.  You and do the same mitten or do something else entirely different.

Wednesday, November 11, 2015

Babies, babies and more babies

One of the most rewarding times to knit is when someone is having a baby.  I love to knit for babies.  I am a firm believer in that fact that every baby should have a heritage blanket~ something special they can treasure and perhaps, pass down to their children.

This past summer and fall I had the joy of knitting 3 baby blankets; 2 for coworkers and 1 for a dear friend.  I am also a bit of a traditionalist and so most of the baby blankets I knit are white.

When working in white there are two very important things to keep in mind.  First, choose a pattern.  White is an ideal choice for a knit with a pattern because it will show very well.  Second, wash your hands.  They hands build up oils as you work and you don't want the oils or any dirt to be knitted into your blanket.

This is a diamond-weave pattern for Harvey.  I had the pleasure of making the blanket~ I did not make the baby  :)


Monday, November 9, 2015

Don't be afraid of Cables

Creating cables

Knitting cables is a technique of knitting that makes the knitting look like ropes or cables, arrows, or honeycomb patterns.  Cables frequently twist, turn and loop around each other.  Cables create a look that is both amazing and incredible.  Looking at a traditional aran sweater and imagining knitting your own can be daunting.

Aran sweaters were first made and still come from the Aran Islands which are off the west coast of Ireland.  The most traditional sweaters are off-white in color because that was the color of the wool produced by the sheep.   Women of the Aran Islands, tightly knit sweaters for their families providing a warm and nearly waterproof garment.

Many wonderful books have been written about the history of aran sweaters.  The stories of unfortunate drowned Irish fisherman being identified based on the unique patterns of their aran sweaters which were used by families or village.

If you're interested in trying cables, DO NOT start with a full sweater.  One of the major reasons is that the gauge of cabled knit is much different from the gauge of regular knitting.  To find the gauge of cabled knit is unique to the knitter and take a bit of time to develop consistently.

But don't be scared by cables.  Try something like this.  This is a small cable; a simple 2 X 2 cable.  It's made by "moving" or cabling 2 stitches.  Cables are done in units.  A 2 X 2 cable is done by moving 2 stitches to a separate needle holding them in front of the work, knitting the next 2 stitches, and then holding the other needle and knitting the 2 stitches on the other needle.  This creates a small cable moving to the right.  That's it.

The more rows between cables the further apart the twists;  the fewer the rows between the cables the tighter the twist.  Don't be afraid of cables; start small and see what happens.

Wednesday, October 28, 2015

TJ Pletcher Memorial Soccer Game- American University


This was a very special day for me~ even with the rain.

My mom, Thelma June (TJ) Pletcher died from breast cancer back before pink was even assigned as the color to rally behind.  My mom lived and died during a time when people didn't talk about breasts, mammograms weren't even developed, and no one talked about cancer, death or dying.  She survived living with cancer for years before celebrating survival was cool.

But I choose not to remember my mom this way.  I choose to remember her joy.  A few things about my mom:  she was 5'12"~ my mom refused to be 6' tall.  She made all of our Halloween costumes. She got in trouble at the District Conference meeting for our church because she switched out the grape juice for REAL wine for the communion service.  The summer after her double mastectomy, we took a family canoeing trip.  Goofing around, our canoe flipped and we all went under.  A quick, panicked pat-down and look around confirmed that the cotton forms Mom used as breast replacements were floating down river without her.  This was at a time when breast reconstruction wasn't perfected.

My mom was also at every game: every softball game and every soccer game, cheering or talking on the sidelines.  Not only was my mom at all of our games, she was, to her very core, a classy woman.  That's one of the reasons I was drawn to sponsor the Men's Soccer team.  Todd West and Kris Hazard are coaching an incredible group of young men.  One of the things Todd consistently says from the sidelines, is "honestly"~ meaning take no fouls, win the contest honestly and with class.

Taking on Navy on the way to the Patriot League Playoffs, American University Men's Soccer won 3-0 in a rain drenched game full of class.

 So, whenever possible, I sponsor events which honor and personify my mom to keep her alive in our memories and hearts.