
Mittens~ a cool weather necessity and great fun to make.
Once the weather turns cool, I can't wait to pull out my hats, scarves and mitten... Mittens are cousins to socks and just as the left sock always seems to be lost somewhere in the process of laundry, at least one mitten goes missing each year as well.
But no worries, mittens are easy, much easier than socks to make, and great fun. And thankfully, just as the teen trend is not to wear matching socks, you don't have to wear matching mittens either.
These are a pair of mittens I made last night. Yep, they're that easy. The cuffs are a simple 2 X 2 rib (K2, P2) followed by stockinette stitch. Don't worry about the thumb; follow the directions and you'll be just fine. You'll slip these stitches off onto either a stitch holder or piece of scrap yarn and knit around them. Once you've finished with the mitten, you'll come back and knit the stitches for the thumb.
But, if you are really afraid of the thumb; skip it. Baby mittens are made without thumbs; you never want to give them gripping power before their ready and besides, have you seen the size of those tiny thumbs?

Because mittens are so easy to do, knitting wise, it's a great time to play with yarn. Go to your favorite yarn shop, mine is A Piece of Ewe. A Piece of Ewe is in Bay City, Michigan and available on the web at www.apieceofewe.com. Susan and her team are fantastic and do mail orders as well. But hit your favorite yarn shop and "pet" yarns. Which feel good? Which are soft and luxurious? Which are so full of color they make you smile? Those are the yarns you should be using for mittens.
The most important thing to remember is to have fun! After you've made one, all you do it repeat. And this is the fun part~ you can repeat in the same color or pattern, or start over again in something completely different! Just remember to be consistent with sizes and you'll never be frustrated over losing ONE mitten again.
Pattern:
Children s:
Medium: (Women's small, youth large)
Large: (Adult)
Using a set of 4 dps, cast on 40 (48, 56) stitches and join in the round. Make K2, P2 rib for 2.5 (3, 3.5) inches. Switch to stockinette stitch for another 1 (1.5, 2) inches.
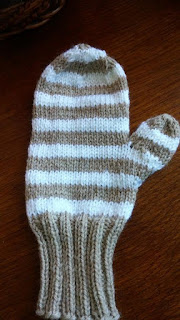
Begin thumb gusset: Take a deep breath, it's ok. Knit 11, place a stitch marker, k3, place 2nd marker, knit to the end of the round.
All of the increases in stitches will happen between these two markers to make the base of the thumb. By adding stitches, you keep the circumference of your hand and you're not "stealing" stitches for the thumb.
Increase round: Knit 11 to the marker. Slip the marker to the right needle. Increase one stitch. I prefer to make a stitch by picking one up (pick up the bar of yarn between the stitch on the right needle and the stitch on the left). Tin Can Knits, another knitting blog, has a fantastic tutorial on how to add these stitches with fun illustrations. Tin Can explains this much better than I can, so please see this post http://blog.tincanknits.com/2013/10/03/m1/ for how to pick up stitches if you need it.
Knit the 3 original stitches, make one stitch between the last stitch and the marker, just as before. Slip marker, knit to end of round.
Next round: knit.
Repeat these two rounds; increase round and knit round, until you have 9 (13, 17) stitches between the markers. Once you have this many stitches, on the next knit row, instead of knitting the thumb stitches, remove the marker and put the stitches on either a stitch holder or piece of string.
From now on, you will knit around these stitches and only work on the hand portion of the mitten. Once the mitten is 8 (9, 10.5) inches long, begin to decrease to shape the top of the mitten. You do this by: K 2, K2tog, all around the mitten. The next row, knit. Next decrease row: K1, K2tog, to end. Next row knit. Final decrease row: K2tog all remaining stitches.
Cutting a long tail, thread the yarn through the remaining stitches and pull tight. You can then knot this off and pull to the inside for a nice rounded top mitten.
Returning to the thumb: Slip the stitches from the holder or scrap yarn back onto your dps. On the first time around the thumb, you will need to pick up three stitches in the saddles of your thumb or where your thumb meets your hand. (If you forget this, you'll have a hole in your thumb pit). Pick up three stitches here and knit in the round over these 12 (15, 20) stitches until the thumb is 1.5" (1.5, 2") from where you picked up your three new stitches against the body of the mitten.
Do NOT measure from the base of the thumb where you started the increases. If you measure from here, you'll have a very short and stubby thumb which won't allow for movement and it will look silly.
Once you've reached 1.5" (2"), K2tog across all stitches. Cut long tail and thread yarn through stitches, rounding off and binding the thumb. Knot on the inside.
You've now made a mitten!!! And for the best part~ repeat. You and do the same mitten or do something else entirely different.


 Take an old sweater and cut the arms off; this will form the base of your mitten. Sew one end of the tube closed, rounding off the end. This will be the top of your mitten. You should have a long tube with one closed end. Next, cut half way up the mitten tube from the open end of the tube. This will make the opening for the thumb flap. You can see the thumb flap in the picture to the right.


